05/06/2023 | by Hope Ojierenem
Introduction:
A Projecta battery charger can be a valuable addition to your caravan setup, ensuring that your batteries are always charged and ready for use. Installing a battery charger requires careful planning and attention to detail. To assist you in successfully integrating a Projecta battery charger into your caravan setup, we’ll give you a step-by-step installation guide in this article.
Step 1: Gather the required tools and materials
Before you begin the installation, gather the following tools and materials:
- Projecta battery charger
- Wiring diagram provided by Projecta
- Wire cutters/strippers
- Crimping tool
- Heat shrink tubing
- Ring terminals
- Cable ties
- Screwdriver or drill
Step 2: Choose a suitable location
Select a suitable location inside your caravan to mount the project battery charger. Ensure it is easily accessible, well-ventilated, and away from any potential sources of water or excessive heat.


Step 3: Disconnect the power source
Prior to installation, disconnect the power source to avoid any electrical mishaps. Disconnect the power cord or switch from the main power source.
Step 4: Mount the projecta battery charger
Using the provided screws and a screwdriver or drill, mount the battery charger securely in the chosen location. Ensure that it is firmly attached to avoid vibrations while on the move.
Step 5: Plan the wiring route
Carefully plan the route for the wiring, considering the shortest and safest path from the battery charger to the battery bank. Take into account any existing wiring or obstacles that you may encounter along the way.
Step 6: Install the main power cable
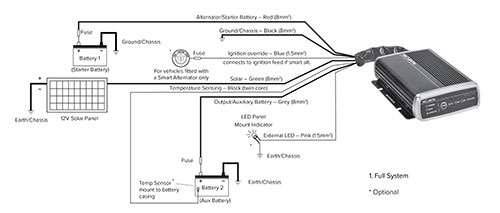
Refer to the provided wiring diagram from Projecta to connect the main power cable correctly. Use wire cutters/strippers to cut the cable to the required length and strip the insulation from the ends. The positive terminal of the battery charger should be connected to one end of the cable. And the positive terminal of the battery bank should be connected to the other end. Secure the connections with crimped ring terminals, ensuring a tight and secure fit.

Step 7: Install the earth cable
Connect the earth cable from the projecta battery charger to the caravan’s earth point. Ensure a solid connection by using crimped ring terminals and secure it tightly.
Step 8: Connect the remote monitor (if applicable)
If your Projecta battery charger comes with a remote monitor, connect it according to the provided instructions. Typically, it involves connecting the monitor to the project battery charger using the supplied cable.
Step 9: Insulate and secure the wiring
Slide heat shrink tubing over the exposed wire connections and use a heat source, such as a heat gun, to shrink the tubing and provide insulation. Secure the wiring neatly using cable ties, preventing any loose or dangling wires that could cause damage during travel.
Step 10: Double-check all connections and test
Before restoring power, double-check all connections to ensure they are secure and correctly wired. Once verified, reconnect the power source and test the projecta battery charger to ensure it is functioning properly.


Conclusion:
Installing a Projecta battery charger in your caravan can greatly enhance your camping experience by ensuring a reliable and convenient power source. By following this step-by-step installation guide, taking into account the provided wiring diagram, and adhering to safety considerations, you can successfully integrate a Projecta battery charger into your caravan setup. Enjoy the benefits of a fully charged battery system wherever your adventures take you.

